Happy Christmas in July!
Be sure to check out all the other amazing projects in this fun blog hop! You can see the entire list at the bottom of this post. Show some love by subscribing to some new blogs and be sure to tell your friends!

Ok! Now on to some fun!
I love not following the directions....
even if they're MINE :)
Here is a fun way to use a placemat pattern to make a little envelope throw pillow cover instead!

You can use this technique with some extra quilt blocks you have left over from your last quilt project...or perhaps even one of those UFOs or PHDs (Unfinished Objects or Projects Half Done) you 'might' have around.
Let's get started!
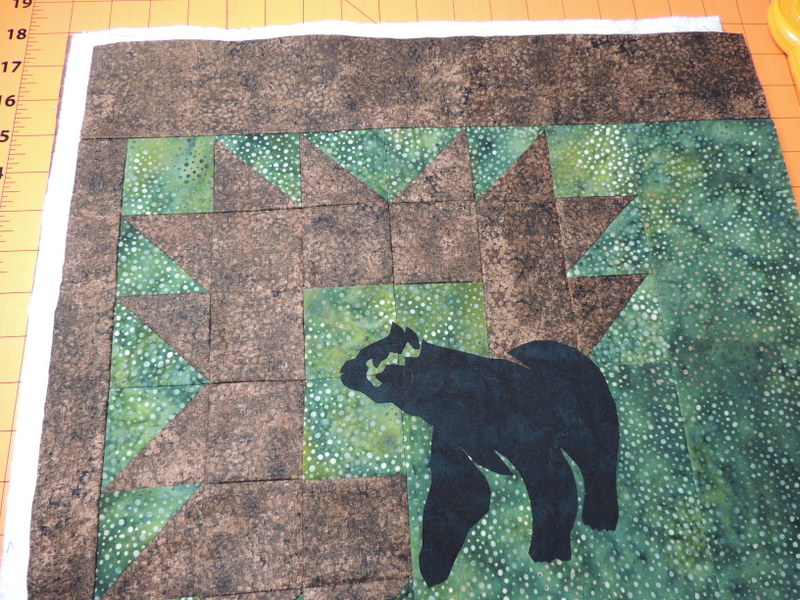
For this demo I used my Montana Settings Placemat Pattern to create the front of my pillow. There are four different block options in the pattern along with over 12 different silhouettes to add to them, so the combinations are endless!
I chose the bear paw block layout and the bear applique to go with it. Enjoy applique but not the tracing and cutting? I even have some ready to fuse laser cut applique shapes to play with as well.

My pillow form that I want to use is 14" x 14".
So my first step after creating my placemat top from my pattern is to extend the short side on my placemat top a few inches so I have enough fabric to measure at least 16". The width of my placemat is 18" so I don't need to add any extra for that measurement.
I added a top border of the brown fabric and we are good to go! I want to have the extra surface area available so that when I quilt the top I have plenty of space to trim to the size needed for my pillow
Next, layer your placemat top with batting and a backing fabric. The backing fabric does not have to be pretty, even a simple muslin will do (as this will be inside your pillow cover once you're done. )

Take your sandwiched layers to your sewing machine and quilt as desired. For my pillow, I stitched in the ditch around the bear paw blocks and then did some basic stippling in the background and outlined the bear silhouette.
Once you have your pillow top quilted, trim it to the desired size for your pillow.
To get the needed size for your pillow form, you want to add 1" to the pillow form size on all sides.
So for example, My pillow form is 14" x 14",
so I've added an inch on all four sides, and trimmed my pillow top to 15" x 15".

Now that our pillow top is ready, it's time to make the back panels.
We will cut (2) pieces to make the back panels.
As these pieces overlap to create the envelope we need to add 6"- 8" to the needed measurement for our pillow.
For my 14" x 14" pillow form:
14 + 6 =20 or 14 + 8 =22 Divide those numbers by 2: 20/2= 10" or 22/2 = 11" and that will give you the measurement you need for the length of your back panels. We will still add the 1" to the width like we did for the pillow front, so I cut my back panels to measure 15" x 10" or 15' x 11" depending on how much overlap you would like on the back of the pillow. Or, you could cut one piece 15" x 10" and one piece 15" x 11" and have the best of both worlds.

I also decided to add some interfacing to the back panels so that the fabric would feel a little fuller and hold up longer if the pillow was going to be in a more 'well loved' environment.
Once you have both of your back panels, take them to your ironing board and fold under 1/4" on one 15" edge on both panels and press in place.
Fold an additional time (another 1/4" over the first fold), so you have a completely finished edge on one side of both panels.

 Take your two panels to your sewing machine and stitch about 1/8" away from the fold to secure it. Repeat for the 2nd panel.
I then did a 2nd stitch about an 1/8" away from the first stitch from the top side of the fabric to help keep the seam nice and flat. Do this for both panels.


Now it's time to put all your pieces together!
Lay your pillow front down right side facing up.
Place one of your back panels right side facing down matching the raw edges on the sides and with the hemmed edge toward the center

Add the 2nd back panel, again matching the raw edges on the top and sides, with the hemmed edge overlapping the first back panel toward the center of your pillow.

Use pins, or wonder-clips to hold all layers together securely on all sides.


Slip your pillow form inside the overlapped edges on the back of your pillow.....
and TA DA! You've created a wonderful little throw pillow!

I hope you have enjoyed this little project idea and will share what fun pillows you decide to make!
If you'd like to find out more about Ladybug's Cabin, swing by my website or
follow me on Facebook or Instagram.
Thanks for joining me today. I hope to see you again!
Happy Hopping!
Check out all the other fun blogs participating in this year's Christmas in July Blog Hop!
Table Toppers, Home and Kitchen
Inquiring Quilter
Duck Creek Mountain Quilting
Cooking Up Quilts
The Quilted Diary
Confessions of a Fabric Addict
Morning Glory Designs
Scrapdash
Days Filled With Joy
Inquiring Quilter
Duck Creek Mountain Quilting
Cooking Up Quilts
The Quilted Diary
Confessions of a Fabric Addict
Morning Glory Designs
Scrapdash
Days Filled With Joy
Small Projects
Geeky Bobbin
Sunburnt Quilts
Tamarinis
Tuning My Heart Quilts
Prairie Sewn Studios
Puppy Girl Designs
Ladybug Buzz
Dragonfly's Quilting Design
Geeky Bobbin
Sunburnt Quilts
Tamarinis
Tuning My Heart Quilts
Prairie Sewn Studios
Puppy Girl Designs
Ladybug Buzz
Dragonfly's Quilting Design
Traditional and Modern Quilt Patterns
Ms P Designs USA
Quilt 2 End ALZ
Patti's Patchwork
Cotton Street Commons
Brown Bird Designs
From My Carolina Home
Ms P Designs USA
Quilt 2 End ALZ
Patti's Patchwork
Cotton Street Commons
Brown Bird Designs
From My Carolina Home